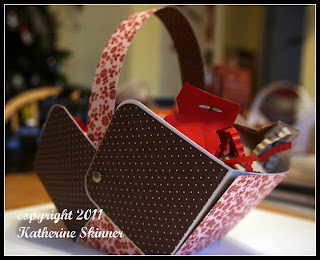
 Linsea went to a sweet 16 birthday party tonight. We didn't have a lot of money- but we wanted to do something special for her. After all, you only turn 16 once. So, I got online and searched for a basket template. I didn't really find one that appealed to me. Next, I looked through my saved files and found one that looked like this one. I had a problem. I don't have a 12"x12" printer. I should invest in one. I figured that 81/2"x11" wouldn't make a basket big enough for what I had in mind. So, I eye-balled it. Go me. I started out with a 12"x12" piece of cardstock- and it worked! But, the basket was bigger than I needed. So, I went smaller- and with the help of my husband ( who is awesome at craft math)- sized it down to my needs. :)
 I filled the basket with little candy wrapper treat boxes filled with chocolates ( Stampin' Up carries this Sizzix die). The red candy wrapper box is made with SU! cardstock-dry embossed with a Sizzix folder, then inked with white craft ink.
 This one is made with craft carstock (from Stampin' Up), dry embossed with Sizzix folder ( also from SU!), and inked with white craft ink.
 I attached brown and white polka dot paper ( designer series from SU!- a few years ago) to the treat box.
 I attached SU! designer paper to this one as well- from the same paper package as the brown paper.
 Here's what they all look like inside ( close up) the basket.
This was my first try. I think I'm going to do this again. Maybe for Easter baskets for the kids this year. Maybe even one for Marcia ( Emma's piano teacher) on/for Valentines Day. She's such a nice lady and she deserves a bunch of sweetness in her life.
It's been a really long day- I think it's time for a cuppa cocoa and a good book before bed. Thanks for stopping by. Have a fun and crafty weekend!


